Auto-feed your plants with GroLab™
GroLab™ system provides a huge amount of possibilities to monitor, analysis, control and automate any kind of agricultural grow. In this post we highlight the plants auto-feeding based on substrate’s moisture.
How does GroLab™ auto-feeding works?
GroLab™ is a modular system composed by several modules types. Each module has its own capacities.
To perform auto-feeding operation it is required to have one GroNode, one SoilBot and, at least, one PowerBot or one TankBot.
GroNode is the core unit of the system, it stores all the configurations and programmable procedures (alarms/schedules). It continuously monitors the other modules and will send them instructions based on the stored configurations.
SoilBot provides all the tools to fully monitor the plants substrate, like moisture and temperature sensors. This module collects the sensors data about substrate and send them to GroNode.
TankBot and PowerBot offers different features, however both can automate the irrigation process. TankBot supports 12VDC devices (small water pumps, solenoid valves…) and PowerBot supports 230VAC (regular water pumps).
Combining those modules with the right GroLab™ programmable procedures will ensure a precise auto-feeding operation.
Yeah… But how does GroLab™ auto-feed my plants?
GroNode will retrieve the substrate information from SoilBot and then based on the stored procedures, previously created by user, will send the instructions to PowerBot/TankBot to turn on/off the desired irrigation devices connected to the module(s). This way GroLab™ will keep the perfect substrate conditions for your plants, avoiding water wasting and improving the plants health.
Ok… I already have the required GroLab™ modules… How can I configure the auto-feeding for my plants?
After installing the GroLab™ modules and GroLab™ Software, you will need to calibrate the SoilBot’s moisture sensor(s). Those sensors constantly analyze the amount of water in the substrate, from 0% (dry) to 100% (wet). This range is fully configurable, which means it is possible to calibrate, for example, 0% as a real moisture rate of 20% and 100% as a real rate of 80%. We recommend using real moisture values when calibrating the sensors, this way you can precisely know the real percentage of moisture in the substrate. Check the GroLab™ Tips & Tricks post that explains how to calibrate the SoilBot’s moisture sensors.
With the SoilBot’s moisture sensors calibrated it is time to use them to create programmable procedures to perform the plants auto-feeding.
We will show you how to create an Alarm to take care of the irrigation process based on the substrate moisture. But… remember it is just an example, you are free to play with the configurations the way you want. To create the Alarm follow the steps below:
1 – Open GroLab™ Software (A), authenticate (B) and proceed to the main menu (C);

2 – Access Alarms section inside Automation group (A). Then click to “Add a New Alarm” (B);

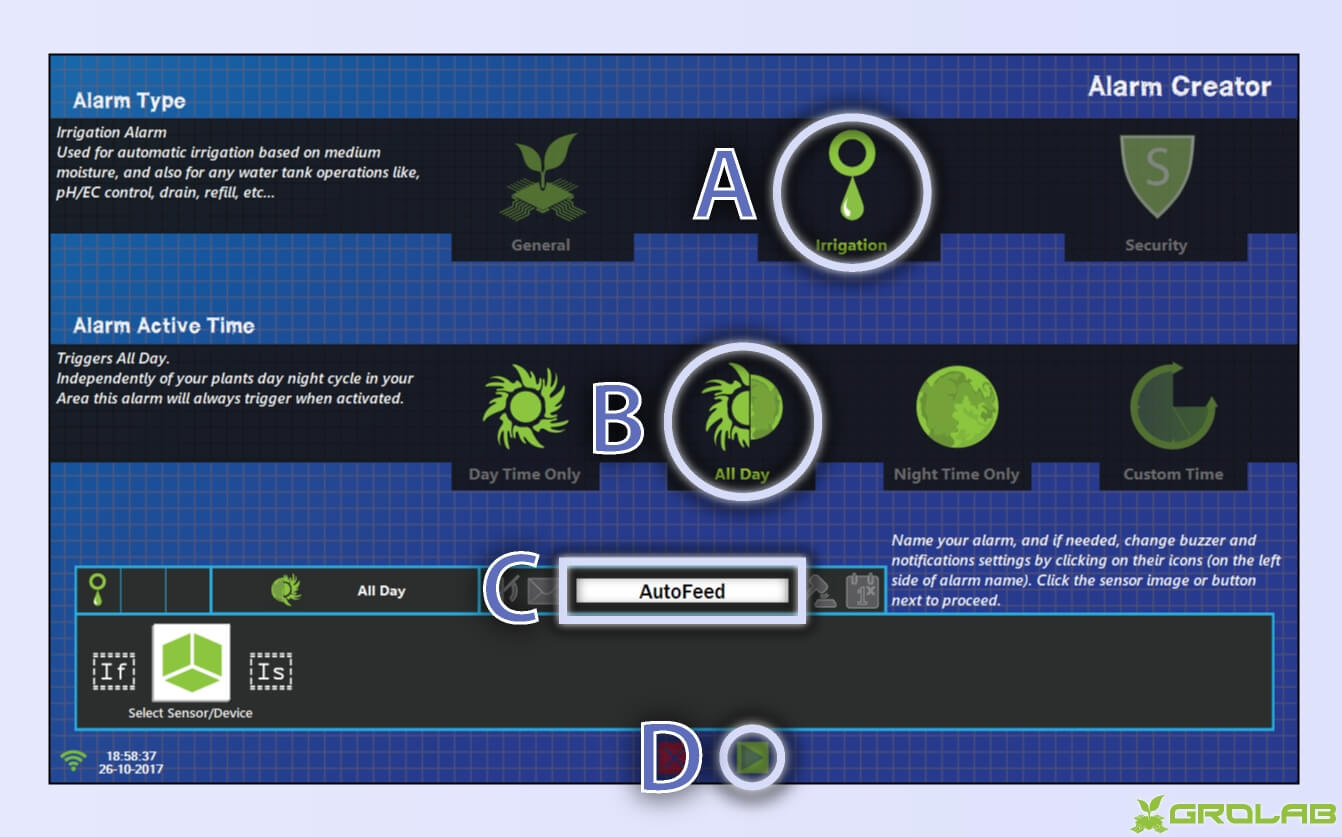
3 – Now it is time to configure the Alarm. Select the irrigation type (A), set the active time to all day (B), note that you can restrict it to day/night time only or even use a custom time interval. Then give it a name (C) and click to proceed (D);

4 – Select the desired moisture sensor from the list (A) and click on the “higher than” icon (B) to switch it to “lower than”. Click to proceed (C);

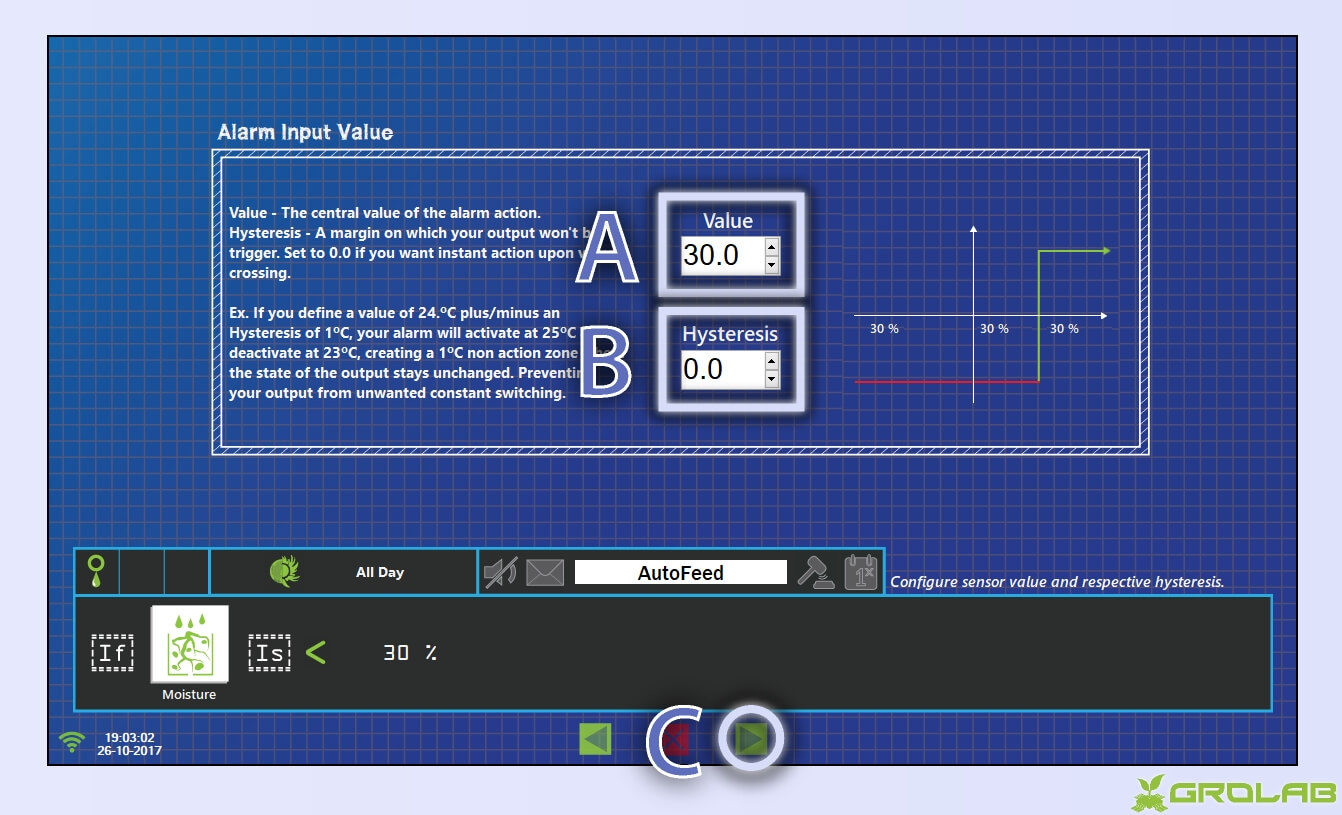
5 – Choose the minimum desired value for substrate moisture (A), we will use 30% but you are free to set whatever you want. Set the hysteresis value (B), in this example we use zero. The hysteresis will not be detailed on this post, however if you want to know more about it check the GroLab™ video tutorials. The current configuration means the Alarm will activate when the moisture level goes lower than 30%. Click to proceed (C);

6 – Select “FOR” as action mode (A). This mode will create a timer while the Alarm is active, it is useful for this example because after irrigate it is recommended to wait few minutes before checking the moisture level, giving time for the water to spread, that’s why we want a timed action for this Alarm. Click to proceed (B);

7- Choose the amount of time to turn a device ON (A) and the time to wait (B) before triggering the timed action again, in case Alarm still active. On this example we set 2 minutes ON and 15 minutes to wait, this means while the moisture level is lower than 30%, the Alarm will turn a device ON for 2 minutes, then turn it OFF for 15 minutes and then turn it ON for 2 minutes and so on until the moisture level is no longer lower than 30%. Click to proceed (C);

8 – Select the irrigation device that you want to use (A). In this case we choose a water pump that is connected to the PowerBot. However, feel free to choose whatever device you want. Then click to proceed (B) and wait the Alarm creation operation to end;

9 – That’s it! GroLab™ system will now automatically feed your plants based on the moisture level. On the image below you can see the Alarm we just created already in action!

Now you can relax and let GroLab™ take care of your plants. GroLab™ will not let them thirsty! If you want to learn more check GroLab™ video tutorials or GroLab™ Tips & Tricks.
